Messages#
This section describes the individual items in the left navigation menu.
Sending Messages#
The web application offers two options for creating and sending messages:
- Using the New Message form
- Using Excel
New Message#
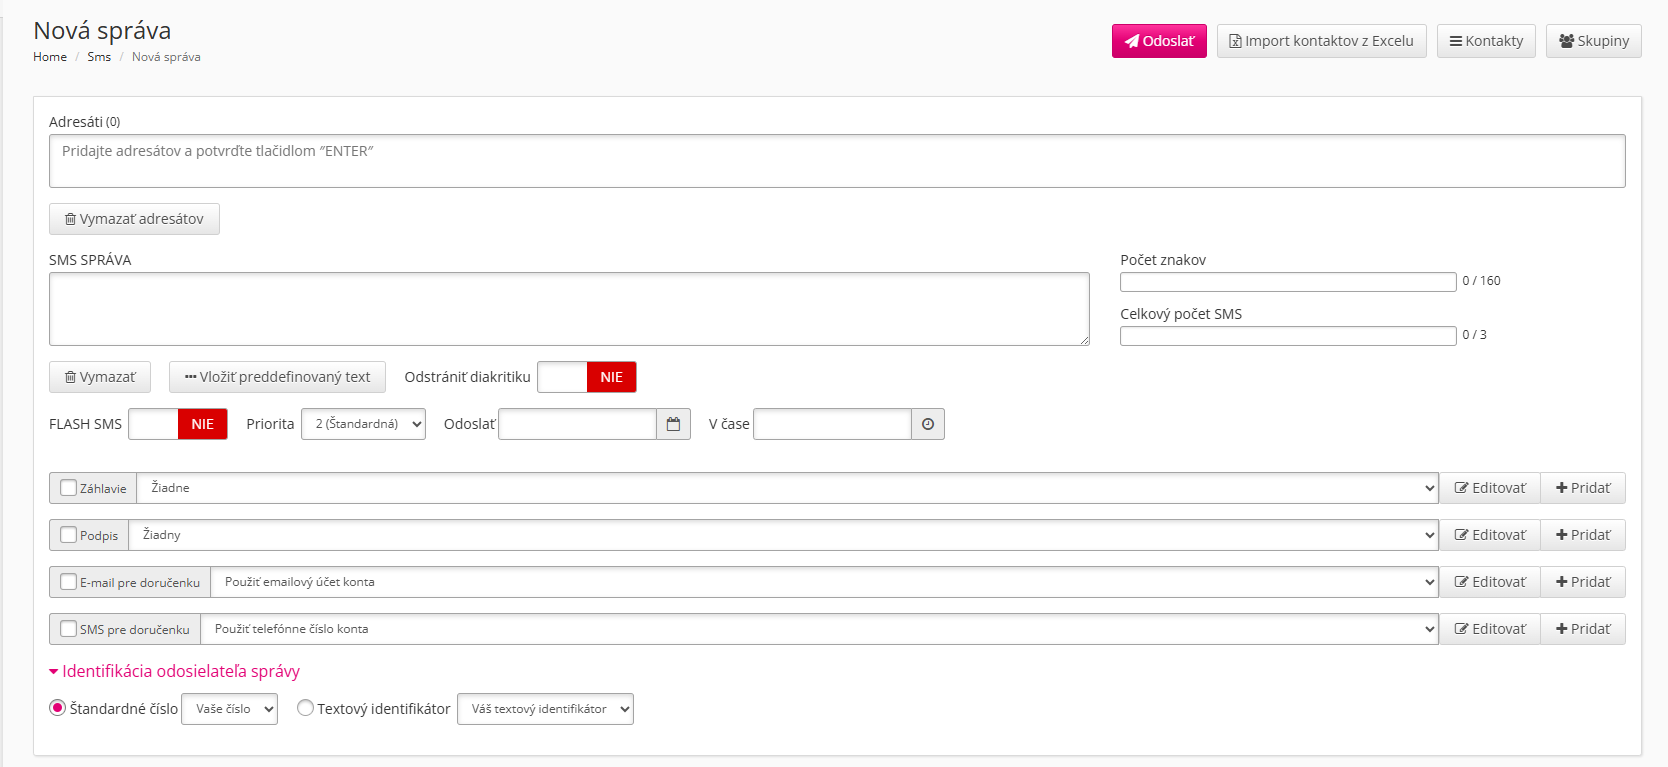
Recipients
Enter the phone numbers to which the message will be delivered in the recipients field. Confirm each new number by pressing the ENTER key.
SMS Message
This field is used to enter the message text. The maximum length of a single message is 160 characters (70 if the message contains diacritics). If the limit is exceeded, the message is automatically split into a maximum of 3 messages.
Tip
Information about message length is displayed to the right of the SMS Message text field. To remove diacritics from the message, you can use the toggle located below the SMS Message text field.
Predefined Texts
The application allows creating and using predefined texts via the Insert predefined text button.
Warning
Inserting a predefined text will replace any existing text in the SMS Message field.
Priority
SMS priority is used to set the sending priority, for example when sending a large number of SMS messages. The default value is 2. If you want the message to be sent with higher priority, use priority 3. If you want it to wait until sending capacity becomes available, use priority 1.
SMS Scheduling
Another available option is scheduling the SMS delivery time. You can select the date and time when the SMS should be sent.
Header and Signature
The application allows inserting a predefined header at the beginning of the message and a signature at the end.
Sender Identification
In this section, you can select a number or text identifier that will be displayed on the recipient's device.
If you choose a text identifier as the sender, the recipient will not be able to reply to the SMS.
If you choose a short number, only recipients within the Slovak Telekom network will be able to reply.
Importing Contacts
- Click the Contacts button in the upper-right corner of the screen.
- In the dialog window that appears, select the contacts to whom you want to send the message using checkboxes.
- Clicking the first checkbox selects all contacts.
- Click the Import button at the bottom of the screen and the selected contact numbers will be automatically added to the Recipients field.
Importing Contact Groups
- Click the Groups button in the upper-right corner of the screen.
- In the dialog window that appears, select the groups to which you want to send the message using checkboxes.
- Clicking the first checkbox selects all contacts.
- Click the Import button at the bottom of the screen and all contact numbers in the selected groups will be automatically added to the Recipients field.
Importing Recipient Numbers from Excel
To import recipients using Excel, simply create a new .xls file where each number is written on a new row in the first column.
A template file can be downloaded here.
Sending Messages via Excel#
- To send messages using Excel, open the form by clicking Imported from Excel in the left section of the screen.
- Download the template file using the Download XLS template button or here.
-
Fill in the required fields in the template file.
Column Description Recipient (A) Required. Recipient number in the format 4219XXXXXXXXor09XXXXXXXX.Sender (B) Text identifier or short number (only if account settings allow it). If left empty, the primary number will be used. Filter ID (C) Any text used to distinguish messages and search for them in the sent messages overview. Date and Time (D) Delayed sending. Format: year-month-day hour:minute(e.g.2025-04-12 17:15).Text (E) Required. Message text. Variable1 to X Optional columns used for inserting dynamic text into the message. More info can be found here -
Save the file.
-
Click Import from Excel and CSV and in the dialog window select your file using the Choose file button.
-
If you know your messages will exceed 160 characters (70 if containing diacritics), you can enable automatic message splitting into a maximum of 3 messages.
- You can also enable diacritics removal in the dialog window.
How to Use Variables When Sending Messages via Excel#
When defining variables, the following rules must be followed:
- Variables must be defined in the first row of their column. They can be defined in any column starting from column F without limitation and in any order. If a variable is not defined or defined incorrectly, the message text will not be modified.
- A variable in the text must be enclosed with the # symbol at the beginning and end of the word.
- example:
#variable1#
- example:
Instructions for creating a specific message with variables:
- In column Text (E) define the message text with variables for each recipient.
- e.g. - Hello #name#, I wish you all the best for your #age# birthday.
- In columns F and beyond, define the variable names.
- e.g. cell F1 contains name
- cell G1 contains age
- In cells F2 and F3, insert recipient names.
- F2 - Peter
- F3 - Lukáš
- In cells G2 and G3, insert recipient ages.
- G2 - 37
- G3 - 22
- Import the messages using the web interface.
- The resulting messages will be:
- Hello Peter, I wish you all the best for your 37th birthday.
- Hello Lukáš, I wish you all the best for your 22nd birthday.